
How To Apply
QT Medical Electrode Strips
How to Apply Strip?
Watch the first 10 seconds of the video in order to see how to line up the electrode strip for proper application.
Once you have applied the main strip, put your shirt back on and return to the screening area.
Note for females, once you have applied the main strip, pull the electrodes off of the strip and let them hang over your bra so they are easily accessible once you enter the screening area. Once there, the heart screeners will help you to apply the 3 leads where needed.
Steps for Applying Electrode Strip

You must first remove the outer protective wrapper from the electrode strip to expose the adhesive that will attach to your skin.
REMOVE WRAPPER

The electrode adhesive must be applied directly to your skin. Please remove any clothing that would interfere with proper application.
REMOVE SHIRT & UNDER SHIRT

Watch the first 10 seconds of the video above to properly adhere main strip & make sure electrodes are accessible under bra.
WATCH 10 SECOND VIDEO

Carefully return outerwear before returning to the heart screening area. Make sure to not catch the electrodes in the process.
PUT SHIRT BACK ON

Return to the heart screening area and await instructions from a heart screener in order to get your ECG.
RETURN TO SCREENING AREA
Extra Guide for Females
STEP 1
It is advised to remove the bra and hold the left breast up to a "neutral position", place the "blue box" in the center of the chest between nipples.

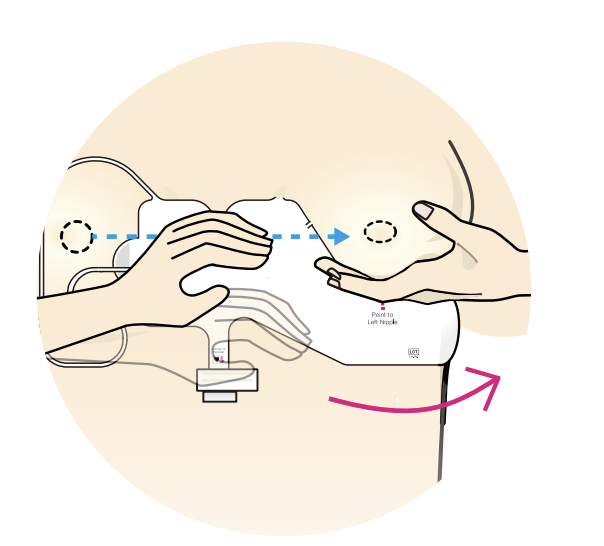
STEP 2
Wrap the tail of the strip around the underside of the left breast. Press on all parts of strip to ensure good adherence to the skin.
STEP 3
In some women, it may be challenging to place the "blue box" between the breasts. It may be necessary to move the entire strip slightly lower to allow more space for better placement.

Get Involved
-
![]()
Social Advocacy
The simplest way for you to support our mission is by sharing about us on your social media.
-
![]()
Heart Screenings
An ECG is one of the only ways to catch a life-threatening heart defect before SCA occurs. Have you been screened?
-
![]()
AED Placement Programs
AEDs assist in life-saving, time-sensitive measures that must be taken when a person has a SCA event. Make sure your community has an AED.
-
![]()
Physicians
The physicians involved in WWPF help us to read ECGs from our participants and host ECGs in their offices.


